
Welcome to my Studio
Discover the evolution of Jean M. Judd's textile studio.
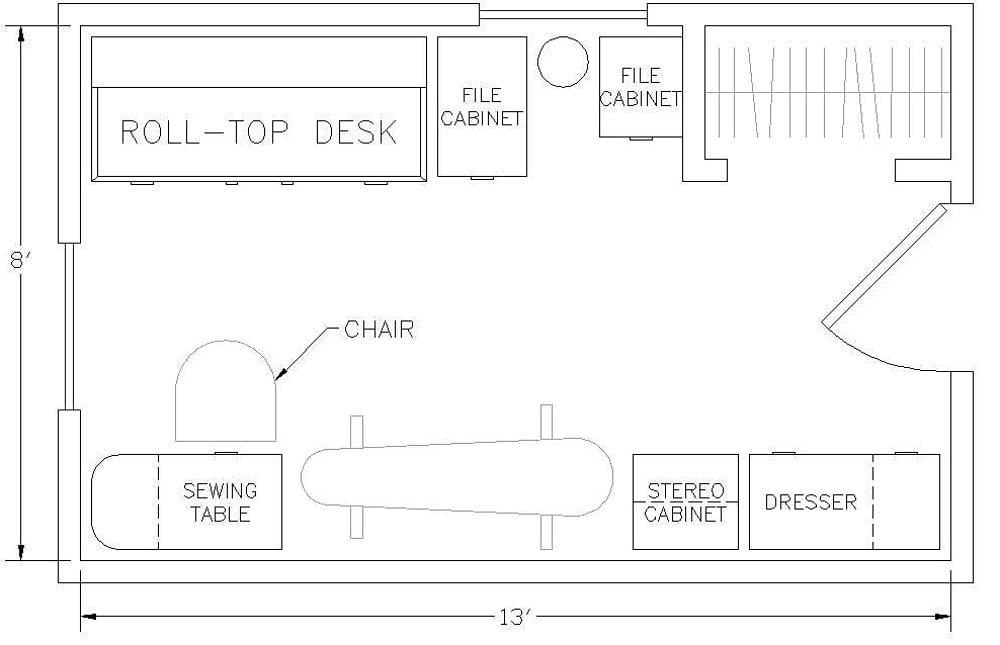
As our art has evolved and changed over the years, so should our studios. Here is the story behind the evolution of my quilt studio from half of a tiny room into the large two room studio it is today. The photo on the left is how the house is today and my studio entrance from the outside is under the front deck. In 1991 we moved from our tiny two-bedroom Cape Cod style house in southern Minnesota into an early 1900s farm house in rural Wisconsin. The first-floor bedroom was a tiny room measuring 8 feet 9inches by 13 feet 3 inches. There were two windows, one on the south side and one on the west and a tiny closet that you could get about 15 hangers inside. I claimed this room as my art studio on the east half and the other half became my office area, with my roll-top desk and two-drawer filing cabinet.
My studio area consisted of my sewing table, which was 34 inches long by 17 inches wide, a classic sewing table picked up in Japan in the early 1980s from a recycling pile, an ironing board, and a Japanese dresser with five drawers that was also 34 inches long by 17 inches wide, another finds in a recycling pile in the early 1980s. These three items filled up the one 13-foot-long wall. The rolltop desk was directly behind my sewing machine so I could pretty much back up a foot, rotate in the office chair I used and be at my desk.
This made for short commutes between the construction area of my studio and the business end, but didn’t leave much space for storage of materials, cutting of fabric, design space or usable area for construction of larger art quilts. My cutting space was a 24x30 inch cutting matt on the floor of the studio which I had to step over on the way to the ironing board. Ah, to be young again!
Unfortunately, I cannot locate any of the photos of this original studio space. Total square footage of my first studio and office was 107 square feet. Above is a floorplan drawing of this space.
1998 was the year we finally decided to remodel the farm house. The renovation took us over a year to have completed. The entire house was raised up and a full basement was put under the house. An addition was also added to the east side of the house and the west side of the house. The total square footage went from 1,420 square feet to 3600 square feet. During all this turmoil, we continued to live in the house, and I was trying to design and make quilts in this construction zone. We had a narrow "draw bridge" with only a railing on one side, to access the house while the house was raised up and the new foundation was being built and laid. The water heater was out in the yard with a garden house running to the house for water. This was a three-month process starting in August and the siding was put on the week before Thanksgiving. We still had all the interior work to do ourselves which we finished in time to host Christmas (December 24, 1998, 7:30pm) for my sisters' two families.
My quilt studio moved from the main second floor to the third floor after the renovation and seemed huge at the time of that move. My new studio was 12 feet by 12 feet now and I was able to add a cutting table as well as a new sewing table that was 8 feet by 4 feet. Storage for fabric grew also so that I could store eleven 15-gallon tubs of fabric under my cutting and sewing tables. I also added a converted stereo case to house my growing collection of quilt and art books.
When my daughter got married and moved out in 2003, I took over her room to become my cutting room and installed an 8 foot by 4 foot cutting table in there. It filled the 13-foot x 7 ½ foot room and was only usable on one and a half sides. The second-floor rooms all have the slanted farm house ceilings so unless you were only about 4 feet tall, you could not stand upright in a good portion of the room. In fact, the rooms were so small, that I couldn’t take photos of the rooms easily. I was able to store more tubs of fabric under this table as well as bolts of fabric that I was now purchasing. The shelves under the one end of the cutting table were against the wall, so they had to be faced under the table, so I had to crawl under the table to get at the fabrics stored there.
My design wall hung in the narrow 16 foot by 3 ½ foot hallway between my cutting room and studio. Even using a peephole from a door to try to view my work didn't work well in this tiny area. I just couldn't get far enough away to see the overlook of a piece.
My library of quilt and art books had now grown so large that it was moved out to an alcove in the hallway in a book case that there was no room for in the studio. The more time I spent in my studio, the more inconvenient I found it and the more wasted time I had looking for fabrics in multiple storage containers and time spent walking in between cutting room, studio, and design wall. I really found it inconvenient when I had to run down two flights of stairs to use my computer. It made checking minor details or looking up something on the Internet a real hassle.
My office area was in the new basement, two floors below my studio in an 11 foot by 5-foot alcove. The computer was in another room in the basement. The washer and dryer were also in the basement which was a must for pre-washing fabrics before using them in the designs. So, really nothing was convenient, but it did promote a good exercise program when I needed to look something up in the office or on the Internet or wash fabric. My total studio space at this time was 398 square feet.
2007 rolls around and I have decided that my youngest is now finishing his junior year of college and is only home twice a year for three months so he could give up his bedroom and move to the first floor where his bathroom was located. He was the one who utilized the first floor the most even though he wasn’t home except for two months in the summer and for a month at Christmas. Maybe it is time for another remodeling project. My dream studio was to open up the entire third floor of the house to be my studio and to put in a new stairway to replace the narrow farmhouse stairway of the early 1900s.
Calling in two different contractors gave us the unhappy answer that unless we totally removed the third floor and reconstructed, there was no way to have one large room on the third floor due to the roof angles. Also, the only way to reroute the stairway to the third floor was to lose half of the room space between the kitchen and living room.
Now we needed to do some serious consideration of spending three to four times what we had planned on to make the studio on the third floor. It appeared that my options were to deal with what I had currently, find some very creative financing for a MAJOR renovation or to find a third option. The third option became the one we chose which was to empty out the two main rooms on the first floor walk out. This consisted of a large recreation/exercise room and the room that housed my computer and my husband’s coaching paraphernalia.
The move started the end of June of 2007. My family was amazed at the amount of fabric, gadgets, etc. that was in my studio rooms. It took three 15-hour days to haul everything down to the first floor and another three days to move selected items up into the rooms on the third floor. Now there is an entertainment/TV room where my cutting room was that my college son can use when he is home in the summer. My main studio room became a guest room with a TV and futon sofa.
The chaos in my new studio took three weeks of solid work to sort and find new homes for everything. It was very overwhelming at first seeing the piles and piles of tubs, bolts of fabric and furniture just put into the rooms. The picture shows me in the new space with about half of the supplies and furniture moved from the third floor. I wasn’t sure how I was going to fit all this stuff in this space and how in the world it had been in the old space.
I added new Full Spectrum lighting to both rooms in my new studio. What a joy it is seeing colors in their true shades, hues, and tints!
I now have two cutting tables located in the same room. The 4x8 foot one from the third floor is now totally accessible on all four sides and I have plenty of storage underneath as well as in the two shelves at each end. I now can cut long lengths of fabric and have multiple fabrics laid out for cutting at one time, so I am saving lots of time from moving fabrics on and off the main table. The second table is 49”x30” and is great for cutting out smaller pieces.
I also know have a 4x9 foot table that I can use for repairs on antique quilts and for laying out pieces as the art quilt is constructed into the final piece.
I also now have a research area where I can get at my 100 plus quilt and art book collection. This area is perfect for searching for that inspiration or for a particular antique quilt block to develop into the next art quilt.
I am also able to retain the back issues of the various business, quilt, and art magazines that I read in a location where they are easily accessible.
Prior to this, they went into tubs in the loft of the garage. In the middle of the winter, I thought twice about running outside to lookup an article when it was 30 below zero.
I now am the most organized I have ever been in my studio. Everything is sorted and labeled. For the first time ever, I can see my fabric all at one time! I also now know which colors I have more than enough of and which ones I really need to concentrate on adding to my collection. Designing and construction is now so much faster as I am not wasting time going between rooms, floors or moving tubs to find the right fabric. My new studio space is now 720 square feet and is airy, bright and a real joy to work in. I am now ready to dive back into fulltime designing and construction of my art quilts in my new studio.
My design wall in my computer/office room is fantastic. I can get away from the wall and really see what is happening with the design. I also can use it for taking photographs for exhibit entries and documentation of finished art quilts. I can now use the peephole with easy or even a pair of binoculars in reverse to check out the design effects.
January of 2011 I acquired two flat file sections to use for storing some of my textile artworks when not out on exhibition.
These flat files were on their way to a landfill along with three other sections. The files were in wonderful shape and just required an easy cleaning as well as I had to remove one set of dividers from each drawer so I could store up to 36" wide artworks.
I have been looking for these for several years but usually even the used ones were very expensive. I can store anywhere from one to six artworks in each drawer depending on size. The hanging slats for them also fit nicely into the drawer so everything is now together in one place, and I have managed to get rid of two very awkward and space hogging storage units.
May of 2011 I have now added to my studio space a dedicated room for rust pigmentation. This space just off my main studio area is 10 feet x 16 feet. I can now manage much larger pieces and have multiple tables that can be assembled into different configurations for the different trays I have constructed. This also gives me much more space for the architectural ironwork (some of which is displayed on the peg board) as well as for the vintage tractor and vehicle parts I have been salvaging from farms, junk yards and swap meets. Below are a couple of images with one project currently in progress.
I am excited to share the installation of my new flat file cabinets in July of 2015. These were custom built for me out of sealed oak by my husband, Danny Judd. The drawers are deeper and wider than standard flat files and will be lined with acid free paper for storage of my work when not out on exhibition. My production is such that I have already filled the metal flat file cabinet installed in 2011.
Now I will be able to put the smaller pieces in the metal cabinet and the larger pieces will fit nicely in the new one.
March of 2022 came the remodeling of my wet studio where I do my dye painting and rust pigmentation. We installed a white melamine ceiling and additional day light lights. Some rearranging of the area made for more room to get around also.